 close window  How to Glue Watercolor Paper Paintings on Wood Panels
|
|
Special Note: I often demo this in my workshops and later get many emails wanting the step-by-step description of my technique of gluing watercolor paper onto a canvas or wooden panel. I thought this was worth repeating in the ArtsyFartsy News!  No Framing Needed! In my workshops I mostly paint with acrylic paint on watercolor paper, to save packing a lot of canvases each time. Consequently, after a few months of teaching, I have many, many acrylic paintings on paper to frame for the galleries, festivals, etc. To save money, I figured a way to have a unique gallery presentation and get the job done fast. My thought was to glue 19" x 19" paper paintings onto panels. The panel sides and the top edges were painted grey. The paper was then glued on to the canvas with a 1/2" wood border (color) showing all around. The paper had a deckle edge all around and the end result was a totally cool “hand of the artist” presentation. Just think, wood panels with watercolor paper glued on them. No frame, no mat and no glass. The gallery was delighted with the ease in hanging the panel, no scratched frames or glass breakage AND no bothersome reflections. Now for the step by step. 1. I use 20" x 20" Joe’s Prime Cradled Panel.  Painting the Sides 2. I choose a neutral gray color and paint the canvas sides plus an inch or two all around the front. Let dry. 3. The finished art is an acrylic painting on 19" x 19" watercolor paper, 300 lb. Cold Press. Note: This is not a traditional watercolor painting. It’s sealed in an acrylic varnish first.  Squeegee on the Gel Medium 4. Using acrylic “regular” gel medium as my adhesive, I squeegee it all over the entire panel surface and ALSO on the back of the watercolor paper. (Remember, the paper surface has already been sealed in an acrylic varnish.) 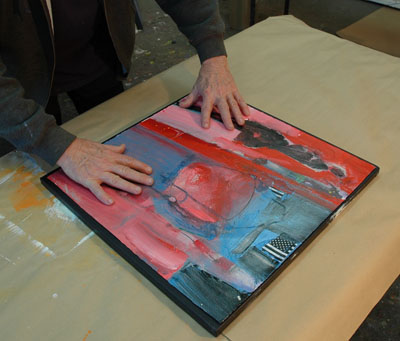 Position the Paper 5. While both surfaces are still wet, I position and center the paper on the panel, making sure the 1/2" borders appear even all around.  Starting from the Center 6. Using a large moist sponge, towels, work from the center and squeeze out any air bubbles and excess gel medium, making sure the deckle edges are smoothed down as tight as possible. The exposed deckle edge gives the presentation a “crafted” look. I would never try to line up a 20" x 20" paper exactly to the edges - So I show the edge. It is what it is! I don’t try to conceal or hide the technique.  Weight the Top 7. Position a 24" x 24" plastic sheet (4 ml polyethylene) on top of the mounted painting. Next, I place a 24" x 24", 1/2" thick board on top of the plastic sheet. Finally a weight, such as a full water bucket, goes on top of the board – to squeeze it all down. (Like pressing flowers.) 8. After 24 hours, I remove the weight, the board, the plastic slip sheet. The entire process results in a very strong adhesion of paper to the panel.  Varnish - the Final Step 9. The final step – I brush on a final acrylic varnish over the entire top surface, including the sides. The hanging wire is screwed into the back of the panel frame. This may sound labor intense but the results are beautiful. It’s lightweight, no frames, no mats and no glass, and is very contemporary. You might ask, why not just paint on the panel? As I said in the beginning, I have many, many paper pieces ready for exhibition and did not want the expense of framing every one. Hey, it’s only an idea I’ve tried and it worked! Try it out and see how you like it! |
If you wish to copy this material to other publications
or mail lists, please ask for permission by contacting:
Robert Burridge Studio
Arroyo Grande, California
805-459-1503
rburridge@robertburridge.com
www.robertburridge.com
close window